How to Take Off the Pedals of a Bike: A Comprehensive Guide
Knowing how to take off the pedals of a bike is a fundamental skill for any cyclist. Whether you’re replacing worn-out pedals, upgrading to a new set, or simply packing your bike for travel, understanding the process is essential. This comprehensive guide will walk you through each step, ensuring you can safely and efficiently remove your bike pedals without damaging your bike or yourself. We’ll cover the tools you need, the proper techniques, and some common pitfalls to avoid. So, let’s get started on learning how to take off the pedals of a bike.
Why You Might Need to Remove Your Bike Pedals
There are several reasons why you might need to take off the pedals of a bike. Here are a few common scenarios:
- Replacement: Pedals wear out over time. The bearings can become rough, the bodies can get damaged, or you might simply want to upgrade to a better performing set.
- Travel: When packing your bike for air travel or shipping, removing the pedals reduces the overall width, making it easier to fit into a bike case or box.
- Maintenance: Sometimes, you might need to remove the pedals to access other parts of your bike for maintenance or repairs.
- Cleaning: Removing pedals allows for easier cleaning and lubrication of the pedal threads and crank arms.
Tools Required to Take Off Bike Pedals
Before you begin, gather the necessary tools. Having the right tools will make the process much smoother and reduce the risk of damaging your bike. Here’s what you’ll need:
- Pedal Wrench or Allen Wrench: Most pedals require either a 15mm pedal wrench or an 8mm (or 6mm, depending on the pedal) Allen wrench. Check your pedals to determine which tool you need.
- Grease: Applying grease to the pedal threads before reinstalling them is crucial to prevent seizing and make future removal easier.
- Gloves (Optional): Wearing gloves can protect your hands from grease and dirt.
- Rag or Paper Towels: For wiping away excess grease and cleaning your tools.
Step-by-Step Guide: Taking Off Bike Pedals
Follow these steps carefully to safely and effectively take off the pedals of a bike:
Step 1: Identify the Left and Right Pedals
It’s crucial to identify which pedal is the left and which is the right. The right pedal (drive side) has a standard thread, meaning you loosen it by turning it counterclockwise. The left pedal (non-drive side) has a reverse thread, meaning you loosen it by turning it clockwise. Many pedals are marked with an “L” or “R” to indicate their side.
Step 2: Position the Crank Arms
Position the crank arm of the pedal you want to remove horizontally. This will give you the best leverage and make it easier to apply force. Make sure the bike is stable, either on a bike stand or leaning against a wall.
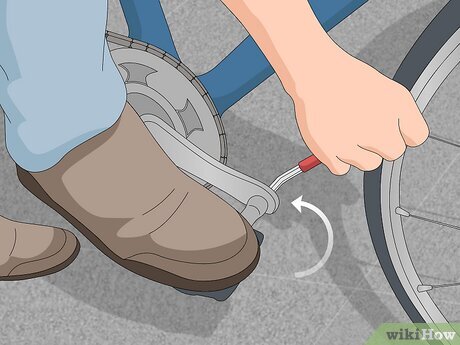
Step 3: Loosen the Pedal
This is the most important step. Remember the thread direction! For the right pedal, place the wrench or Allen wrench on the pedal axle and turn it counterclockwise. For the left pedal, turn it clockwise. You may need to apply significant force, especially if the pedals have been on for a long time. If the pedal is stuck, try using a longer wrench or applying penetrating oil to the threads and letting it sit for a few minutes.
Step 4: Remove the Pedal
Once you’ve loosened the pedal, you should be able to unscrew it by hand. Continue turning the pedal until it’s completely removed from the crank arm.
Step 5: Repeat for the Other Pedal
Repeat steps 2-4 for the other pedal. Remember to reverse the direction you turn the wrench, as the left pedal has a reverse thread.
Common Mistakes to Avoid When Removing Bike Pedals
Even experienced cyclists can make mistakes when trying to take off the pedals of a bike. Here are some common pitfalls to avoid:
- Forgetting the Thread Direction: This is the most common mistake. Always remember that the left pedal has a reverse thread. Forcing the pedal in the wrong direction can damage the threads on the crank arm.
- Using the Wrong Tool: Using the wrong size wrench or Allen wrench can strip the pedal axle or the wrench itself. Make sure you’re using the correct size and type of tool.
- Not Applying Enough Force: Pedals can be very tight, especially if they haven’t been removed in a long time. Don’t be afraid to apply significant force, but be careful not to slip and injure yourself.
- Damaging the Crank Arm Threads: If the pedal is severely stuck, forcing it can damage the threads on the crank arm. In this case, it’s best to take your bike to a professional mechanic.
Reinstalling Your Bike Pedals
Once you’ve taken off the pedals of a bike, you’ll likely want to reinstall them or install a new set. Here’s how to do it properly:
Step 1: Clean the Threads
Before reinstalling the pedals, clean the threads on both the pedal axle and the crank arm. This will remove any dirt, grease, or debris that could interfere with proper installation.
Step 2: Apply Grease
Apply a thin layer of grease to the pedal threads. This will prevent the pedals from seizing and make future removal easier. Use a good quality bicycle grease.
Step 3: Thread the Pedals by Hand
Start threading the pedals into the crank arms by hand. Make sure you’re threading them straight and not cross-threading. The right pedal threads in clockwise, and the left pedal threads in counterclockwise.
Step 4: Tighten the Pedals
Once the pedals are threaded in as far as you can by hand, use your pedal wrench or Allen wrench to tighten them securely. Don’t overtighten them, but make sure they’re snug. A good rule of thumb is to tighten them to the point where you feel resistance, then give them another quarter turn.
Tips for Stubborn Pedals
Sometimes, pedals can be incredibly difficult to remove. Here are some tips for dealing with stubborn pedals:
- Penetrating Oil: Apply penetrating oil to the threads and let it sit for several minutes before attempting to remove the pedal.
- Heat: Applying heat to the crank arm can help loosen the pedal. Use a heat gun or hair dryer, but be careful not to overheat the carbon or damage the paint.
- Longer Wrench: Using a longer wrench will give you more leverage and make it easier to apply force.
- Professional Help: If you’ve tried everything else and the pedal still won’t budge, it’s best to take your bike to a professional mechanic. They have specialized tools and techniques for removing stubborn pedals.
Choosing the Right Pedals for Your Bike
Now that you know how to take off the pedals of a bike, let’s briefly discuss choosing the right pedals for your bike. There are several types of pedals available, each with its own advantages and disadvantages:
- Flat Pedals: These are the most common type of pedal and are suitable for a wide range of riding styles. They provide a large platform for your feet and are easy to use.
- Clipless Pedals: These pedals require special shoes that clip into the pedal. They provide a more secure connection between your foot and the bike, which can improve pedaling efficiency.
- Hybrid Pedals: These pedals have a flat platform on one side and a clipless mechanism on the other. They offer the versatility of both types of pedals.
When choosing pedals, consider your riding style, experience level, and budget. [See also: Best Bike Pedals for Beginners] [See also: How to Choose Bike Pedals] [See also: Maintaining Your Bike Pedals]
Conclusion
Learning how to take off the pedals of a bike is a valuable skill for any cyclist. By following the steps outlined in this guide and avoiding common mistakes, you can safely and effectively remove and reinstall your bike pedals. Remember to always use the correct tools, apply grease to the threads, and be mindful of the thread direction. With a little practice, you’ll be able to take off the pedals of a bike like a pro. Happy cycling!
