
The Ultimate Guide to Sticker Removal From Car Surfaces: A Step-by-Step Approach
Stickers on your car can be a fun way to express yourself or show support for a cause. However, when it’s time to remove them, the process can quickly become frustrating. Whether it’s an old bumper sticker, a promotional decal, or simply a sticker that’s past its prime, knowing how to safely perform sticker removal from car surfaces is essential to avoid damaging your vehicle’s paint. This comprehensive guide will walk you through various methods, offering step-by-step instructions and valuable tips to ensure a clean and scratch-free finish.
Understanding the Challenge of Sticker Removal
Before diving into the methods, it’s crucial to understand why sticker removal from car surfaces can be tricky. Stickers are designed to adhere strongly, and over time, the adhesive can bond even more tightly to the car’s paint. Factors like sunlight, temperature changes, and weather exposure can further harden the adhesive, making the sticker brittle and difficult to peel off cleanly. Attempting to simply rip off the sticker can result in torn pieces, stubborn adhesive residue, and potential damage to the underlying paint.
Essential Tools and Materials for Sticker Removal
Having the right tools on hand can significantly simplify the sticker removal from car process and minimize the risk of damage. Here’s a list of essential items:
- Heat Gun or Hair Dryer: To soften the adhesive.
- Plastic Razor Blade or Scraper: For gently lifting the sticker without scratching the paint. Avoid metal blades.
- Microfiber Cloths: For cleaning and wiping surfaces.
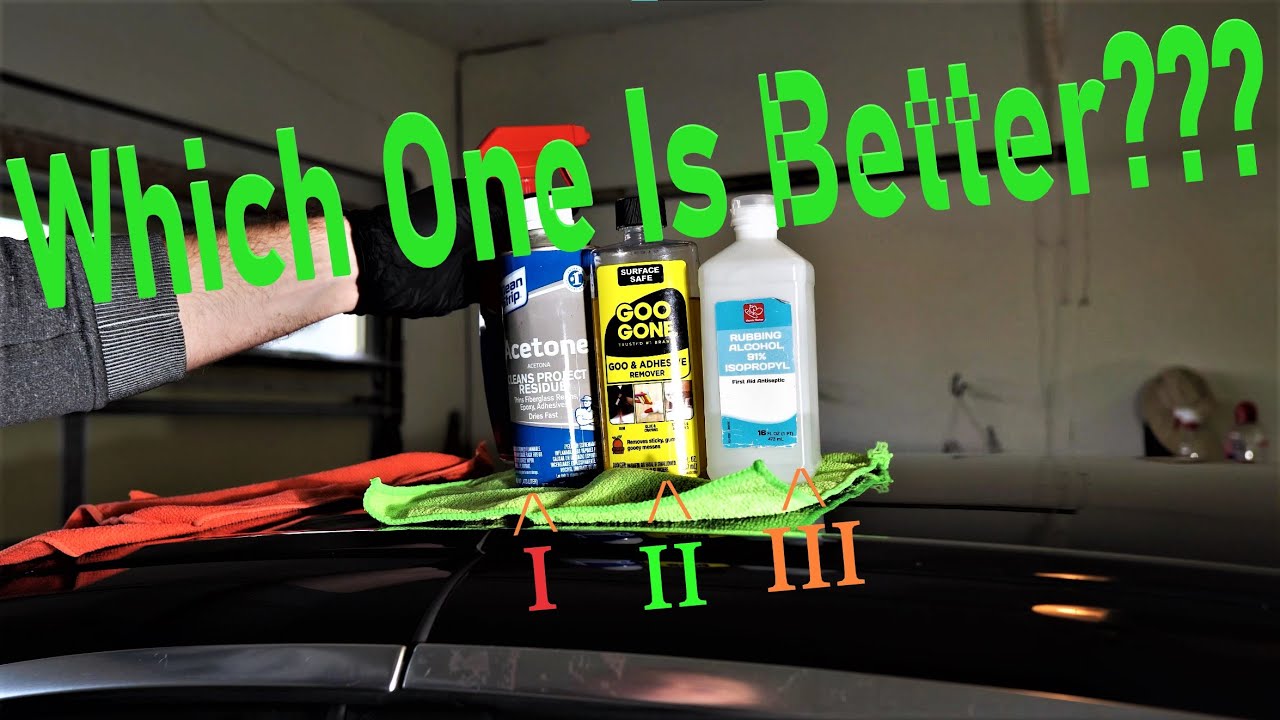
- Adhesive Remover: Specifically designed for automotive use.
- Rubbing Alcohol (Isopropyl Alcohol): An alternative adhesive remover.
- Warm, Soapy Water: For initial cleaning and final wipe-down.
- Spray Bottle: For applying adhesive remover or soapy water.
- Gloves: To protect your hands.
Step-by-Step Guide to Sticker Removal from Car Surfaces
Now, let’s move on to the actual sticker removal from car process. Follow these steps for a safe and effective removal:
Step 1: Cleaning the Area
Begin by thoroughly cleaning the area around the sticker with warm, soapy water. This removes dirt, grime, and any loose debris that could scratch the paint during the removal process. Rinse the area well and dry it with a clean microfiber cloth.
Step 2: Applying Heat
Heat is your ally in softening the adhesive. Using a heat gun or hair dryer, gently warm the sticker for a few minutes. Hold the heat source a few inches away from the surface and move it back and forth to avoid overheating any one spot. The goal is to make the adhesive pliable, not to melt the sticker.
Step 3: Lifting the Edge
Once the sticker is warm, use a plastic razor blade or scraper to carefully lift an edge of the sticker. Work slowly and gently, applying steady pressure. If the sticker resists, apply more heat. Avoid using excessive force, as this can tear the sticker and leave behind more residue.
Step 4: Peeling the Sticker
With an edge lifted, slowly peel the sticker away from the car’s surface. Continue applying heat as needed to keep the adhesive soft and pliable. If the sticker tears, use the plastic razor blade to carefully lift the remaining pieces. Patience is key in this step.
Step 5: Removing Adhesive Residue
After removing the sticker, you’ll likely be left with some adhesive residue. This is where an automotive-specific adhesive remover comes in handy. Spray the remover onto the residue and let it sit for the recommended time (usually a few minutes). Then, use a clean microfiber cloth to gently wipe away the residue. For stubborn residue, you may need to repeat the process.
Alternatively, you can use rubbing alcohol (isopropyl alcohol) as an adhesive remover. Apply it to a microfiber cloth and gently rub the residue until it dissolves. Always test the alcohol on an inconspicuous area first to ensure it doesn’t damage the paint.
Step 6: Final Cleaning and Polishing
Once all the adhesive residue is removed, clean the area again with warm, soapy water to remove any traces of the adhesive remover or alcohol. Rinse well and dry with a clean microfiber cloth. Finally, you can apply a coat of wax or polish to protect the paint and restore its shine. [See also: Car Detailing Tips for Beginners]
Alternative Methods for Sticker Removal
While the above method is generally effective, here are a few alternative approaches you can try:
- WD-40: WD-40 can be surprisingly effective at dissolving adhesive. Spray it onto the sticker and let it sit for a few minutes before attempting to peel it off.
- Vinegar: White vinegar is another natural adhesive remover. Soak a cloth in vinegar and apply it to the sticker for several minutes before peeling.
- Peanut Butter: Believe it or not, the oils in peanut butter can help break down adhesive. Apply a layer of peanut butter to the sticker, let it sit for about 30 minutes, and then wipe it away.
Preventing Damage During Sticker Removal
The most important aspect of sticker removal from car surfaces is to avoid damaging the paint. Here are some tips to help you prevent scratches and other damage:
- Avoid Metal Blades: Always use plastic razor blades or scrapers to avoid scratching the paint.
- Don’t Overheat: Be careful not to overheat the sticker or the surrounding paint. Overheating can damage the clear coat.
- Test Adhesive Removers: Always test adhesive removers on an inconspicuous area before applying them to the entire sticker.
- Use Gentle Pressure: Avoid using excessive force when peeling or scraping the sticker.
- Work in a Shaded Area: Avoid working in direct sunlight, as this can make the adhesive even harder to remove.
When to Seek Professional Help
In some cases, sticker removal from car surfaces may be too challenging or risky to attempt on your own. If the sticker is very old, large, or located on a delicate area of the car, it’s best to seek professional help from an auto detailing shop. Professionals have the experience, tools, and products to safely remove even the most stubborn stickers without damaging your car’s paint. [See also: Finding a Reputable Auto Detailer]
Long-Term Care After Sticker Removal
Once you’ve successfully completed the sticker removal from car, it’s important to take steps to protect the area and prevent future damage. Applying a coat of wax or sealant will help protect the paint from UV rays, oxidation, and other environmental factors. Regularly washing and waxing your car will also help maintain its appearance and prevent stickers from becoming too difficult to remove in the future.
Choosing the Right Stickers for Your Car
If you plan on adding more stickers to your car in the future, consider choosing stickers that are designed for easy removal. Look for stickers that use a low-tack adhesive or are made from a material that is less likely to leave behind residue. Applying a clear vinyl overlay to the sticker can also help protect it from the elements and make it easier to remove later on.
Sticker removal from car surfaces doesn’t have to be a daunting task. By following these steps and using the right tools, you can safely and effectively remove stickers without damaging your vehicle’s paint. Remember to be patient, work carefully, and always prioritize the safety of your car’s finish. With a little effort and the right techniques, you can keep your car looking its best, free from unwanted stickers and unsightly residue. The key to successful sticker removal from car lies in preparation, patience, and the right tools. Don’t rush the process, and always prioritize protecting your car’s paint. If you’re unsure about any step, it’s always best to seek professional help. Proper sticker removal from car is an art, and with practice, you’ll master it in no time. Understanding the nuances of sticker removal from car will save you time and money in the long run. Always remember safety first when performing sticker removal from car to maintain the integrity of your vehicle. Consider this guide your go-to resource for all things related to sticker removal from car. When in doubt, a professional sticker removal from car service is your best bet. This method of sticker removal from car is tried and true. Finally, ensure a clean finish after sticker removal from car with a quality wax. This guide provides a reliable process for sticker removal from car surfaces.
