What to Use to Remove Silicone Caulk: A Comprehensive Guide
Silicone caulk is a versatile sealant used in various applications, from bathrooms and kitchens to windows and doors. Its waterproof and flexible nature makes it ideal for sealing gaps and preventing leaks. However, over time, silicone caulk can become discolored, cracked, or simply outdated, necessitating its removal and replacement. Removing silicone caulk can be a challenging task if you don’t know the right tools and techniques. This comprehensive guide will explore various methods and products to effectively remove silicone caulk, ensuring a clean and smooth surface for recaulking. Knowing what to use to remove silicone caulk is crucial for a successful DIY project.
Understanding Silicone Caulk and Why Removal is Necessary
Silicone caulk is a synthetic polymer that provides a durable and waterproof seal. It adheres strongly to various surfaces, including tile, glass, metal, and plastic. While its adhesive properties are advantageous, they also make removal tricky. Over time, silicone caulk can deteriorate due to exposure to moisture, UV radiation, and temperature fluctuations. This deterioration can lead to:
- Discoloration: Silicone caulk can turn yellow or black due to mold and mildew growth.
- Cracking: The caulk can crack and lose its flexibility, compromising its ability to seal effectively.
- Peeling: The caulk can peel away from the surface, creating gaps where water can penetrate.
When any of these issues arise, it’s essential to remove the old silicone caulk and replace it with fresh caulk to maintain a watertight seal and prevent water damage. Choosing what to use to remove silicone caulk depends on the extent of the damage and the surface you’re working on.
Tools and Materials Needed for Silicone Caulk Removal
Before diving into the removal process, gather the necessary tools and materials. Having the right equipment will make the job easier and more efficient. Here’s a list of essential items:
- Utility Knife or Caulk Removal Tool: A sharp utility knife or a specialized caulk removal tool is essential for cutting through the silicone caulk.
- Putty Knife or Scraper: A putty knife or scraper will help to lift and remove the caulk from the surface.
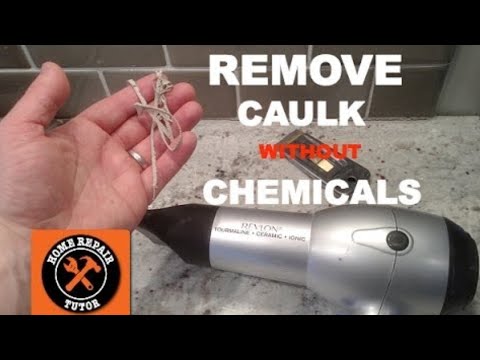
- Heat Gun or Hair Dryer: Applying heat can soften the silicone caulk, making it easier to remove.
- Silicone Caulk Remover Solvent: Chemical solvents specifically designed to dissolve silicone caulk can be very effective.
- Mineral Spirits or Isopropyl Alcohol: These solvents can help to clean up any remaining residue.
- Gloves: Protect your hands from chemicals and sharp tools.
- Safety Glasses: Protect your eyes from debris and chemical splashes.
- Rags or Paper Towels: For cleaning and wiping surfaces.
- Vacuum Cleaner: To clean up debris after removal.
Consider purchasing a caulk removal kit. These kits often include a variety of tools and solvents specifically designed for removing silicone caulk. Selecting what to use to remove silicone caulk from this list depends on your specific needs and preferences.
Step-by-Step Guide to Removing Silicone Caulk
Follow these steps to effectively remove silicone caulk:
Step 1: Prepare the Area
Start by preparing the area where you’ll be removing the silicone caulk. Clear any obstructions and cover nearby surfaces with drop cloths or plastic sheeting to protect them from debris and solvents.
Step 2: Soften the Caulk (Optional)
If the silicone caulk is particularly stubborn, you can soften it by applying heat. Use a heat gun or hair dryer on a low setting and direct the heat onto the caulk for a few seconds at a time. Be careful not to overheat the surface, as this could damage it. This step makes it easier to determine what to use to remove silicone caulk effectively.
Step 3: Cut Through the Caulk
Using a sharp utility knife or caulk removal tool, carefully cut along both edges of the silicone caulk. Apply firm, even pressure to slice through the caulk without damaging the underlying surface. Make multiple passes if necessary. The goal is to separate the caulk from the surface it’s adhered to.
Step 4: Scrape Away the Caulk
Insert a putty knife or scraper underneath the cut edge of the silicone caulk and gently pry it away from the surface. Work slowly and carefully to avoid damaging the surface. If the caulk is difficult to remove, try applying more heat or using a solvent to soften it further. Consider different types of scrapers when deciding what to use to remove silicone caulk.
Step 5: Apply Silicone Caulk Remover Solvent
If scraping alone isn’t sufficient, apply a silicone caulk remover solvent to the remaining residue. Follow the manufacturer’s instructions carefully. Typically, you’ll need to apply the solvent to the caulk residue, let it sit for a specified amount of time (usually 15-30 minutes), and then scrape away the softened residue. Always wear gloves and safety glasses when working with solvents. The effectiveness of what to use to remove silicone caulk often comes down to choosing the right solvent.
Step 6: Clean the Surface
Once you’ve removed all the silicone caulk, clean the surface thoroughly with mineral spirits or isopropyl alcohol to remove any remaining residue. Use a clean rag or paper towel to wipe the surface until it’s clean and dry. This step is crucial for ensuring proper adhesion of the new caulk.
Step 7: Inspect and Prepare for Recaulking
Inspect the surface for any damage or imperfections. Repair any cracks or holes before applying new caulk. Make sure the surface is completely dry before proceeding. Proper preparation will ensure a long-lasting and watertight seal.
Choosing the Right Silicone Caulk Remover
Several silicone caulk remover products are available on the market. Here are a few popular options:
- Goo Gone Caulk Remover: This product is designed to soften and dissolve silicone caulk, making it easier to remove.
- Motsenbocker’s Lift Off Caulk & Sealant Remover: This remover is effective on various types of caulk and sealants, including silicone.
- 3M Caulk Remover: A reliable option from a trusted brand, 3M Caulk Remover is designed to quickly dissolve silicone caulk.
When choosing a silicone caulk remover, consider the following factors:
- Surface Compatibility: Make sure the remover is compatible with the surface you’re working on. Some removers may damage certain materials.
- Odor: Some removers have a strong odor, so choose one with a milder scent if you’re sensitive to smells.
- Application Method: Consider whether you prefer a spray, gel, or liquid remover.
Reading reviews and comparing different products can help you determine what to use to remove silicone caulk that best suits your needs.
Alternative Methods for Silicone Caulk Removal
In addition to using solvents, several alternative methods can be used to remove silicone caulk:
- Vinegar: Soaking the caulk in vinegar can help to soften it, making it easier to scrape away.
- Baking Soda Paste: Applying a paste of baking soda and water to the caulk can help to break it down.
- Steam: Using a steam cleaner can help to soften the caulk and loosen its grip on the surface.
While these methods may not be as effective as using a dedicated silicone caulk remover, they can be worth trying if you prefer a more natural approach. The choice of what to use to remove silicone caulk ultimately depends on your preferences and the severity of the caulk adhesion.
Safety Precautions When Removing Silicone Caulk
When removing silicone caulk, it’s essential to take safety precautions to protect yourself from injury and exposure to chemicals:
- Wear Gloves: Protect your hands from sharp tools and chemical solvents by wearing gloves.
- Wear Safety Glasses: Protect your eyes from debris and chemical splashes by wearing safety glasses.
- Ventilate the Area: Ensure proper ventilation when using solvents to avoid inhaling harmful fumes.
- Follow Manufacturer’s Instructions: Always follow the manufacturer’s instructions when using chemical removers.
- Dispose of Waste Properly: Dispose of used caulk, rags, and solvent containers according to local regulations.
By following these safety precautions, you can minimize the risk of injury and ensure a safe and successful silicone caulk removal process.
Tips for Preventing Silicone Caulk Issues
To minimize the need for frequent silicone caulk removal, consider these tips:
- Choose High-Quality Caulk: Use a high-quality silicone caulk that is designed to resist mold, mildew, and UV damage.
- Proper Surface Preparation: Ensure the surface is clean, dry, and free of debris before applying caulk.
- Apply Caulk Evenly: Apply the caulk in a smooth, even bead to ensure a watertight seal.
- Regular Cleaning: Clean the caulk regularly to prevent the buildup of mold and mildew.
By taking these preventative measures, you can extend the life of your silicone caulk and reduce the need for frequent removal and replacement. Knowing what to use to remove silicone caulk is helpful, but prevention is even better.
Conclusion
Removing silicone caulk can be a challenging task, but with the right tools, techniques, and safety precautions, it can be accomplished effectively. Whether you choose to use a utility knife, a caulk removal tool, or a chemical solvent, following the steps outlined in this guide will help you achieve a clean and smooth surface for recaulking. Remember to prioritize safety and take the necessary precautions to protect yourself from injury and exposure to chemicals. Understanding what to use to remove silicone caulk and implementing preventative measures will ensure a long-lasting and watertight seal.
[See also: How to Apply Silicone Caulk Like a Pro]
[See also: Best Types of Caulk for Bathrooms]
